Passport Photo Dimensions USA: The Complete 2x2 Guide
Learn the exact passport photo dimensions USA requires (2 x 2 inches) and how to meet background, head position, and photo quality standards to ensure smooth approvals.

Why passport photo dimensions usa matter
According to What Dimensions, getting passport photo dimensions usa exactly right reduces rejection risk and delays. In this section, we explore how precise sizing, proper centering, and a clean background affect the overall submission. The official rules emphasize consistency and reproducibility, making precise dimensions essential for a smooth approval path. When you measure the photo against the standard 2x2 inch frame, you create a reliable reference that helps you compare prints from different labs. The focus here is not only on aesthetics but on compliance; even small deviations can trigger resubmission or processing delays. By establishing a consistent baseline before retaking, homeowners, students, designers, and shoppers save time and minimize the risk of a rejected submission.
Key official requirements you should know
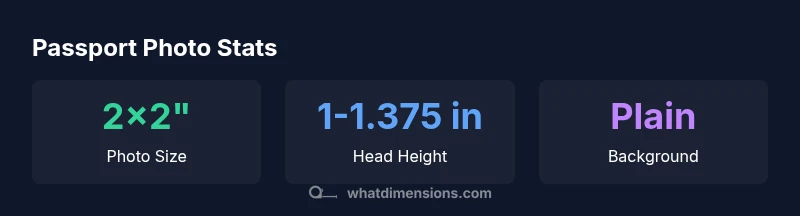
The core requirement is straightforward: a 2x2 inch photo with a neutral face and neutral background. The head height in the image should roughly fall within 1 inch to 1 3/8 inches from the bottom of the photo. The eyes should be positioned about one-third from the top of the frame, and the entire head should fit clearly within the frame without cropping essential features. Background color should be plain white or off-white, with no shadows, textures, or busy patterns. Expressions must be neutral—no smiles or frowns—and the person should face the camera directly with eyes open. Jewelry and hats should be avoided unless required for religious reasons; sunglasses are not allowed.
Practical tips for meeting the size and composition
To nail the 2x2 standard, start with a tripod and a high-contrast background. Use a ruler or a caliper to verify the vertical head height, aiming for 1 inch to 1 3/8 inches in the image. Position the camera at eye level to avoid perspective distortion, and ensure the subject looks straight into the lens with a natural, relaxed expression. Lighting should be even, with no harsh shadows on the face or background. Remove reflective accessories and ensure the ears are visible if possible. A gray or white backdrop under consistent lighting reduces color shifts when printing.
Common mistakes and how to avoid them
Common errors include incorrect framing (head too high or too low), off-center placement, background textures, and excessive shadows. Another frequent issue is wearing glasses with glare or lenses that obscure the eyes. To avoid these, test your setup with a quick shot and review on a bright screen in natural light. Ensure the photo’s color matches a standard neutral white balance, and avoid heavy retouching or exaggerated editing that changes facial features. Remember that printers can vary slightly in output; always compare prints against the official size and composition rules before submitting.
How to verify your photo before submission
Create a simple pre-submission checklist: confirm 2x2 inch dimensions, confirm head height 1–1 3/8 inches, verify background is plain white or off-white, ensure neutral expression, check for glare-free eyes, and inspect for even lighting. Print a test copy on high-quality photo paper to confirm the dimensions and color accuracy. If you’re using a digital upload, compare the uploaded image against the physical print to ensure no cropping or post-processing has altered key measurements.
Digital vs. printed: formatting considerations
US passport applications typically require a physical photograph printed to size, submitted with the application. Some online processes permit digital uploads, but these uploads must still adhere to the same size and composition rules. If you plan to upload, ensure the digital image resolves to at least 600 dpi and remains at exactly 2x2 inches in the final print size when printed. Do not apply aggressive compression or filters that alter facial features or colors.
Scenarios: at-home setup for accurate results
Users can recreate professional results at home by using a plain backdrop, natural daylight, and a camera at eye level. Place a ruler beside the subject to confirm the height, and use a fixed distance to control perspective. Avoid hats, heavy jewelry, and cords or scarves that could obscure the neck. Keep the subject stationary for a short moment to prevent motion blur in the shot.
How What Dimensions can help with exact size references
What Dimensions specializes in providing precise size references for everyday items, including passport photos. By offering exact measurements and practical guidance, we help homeowners and designers avoid guesswork and ensure consistent results across labs and printers. Our team emphasizes reproducible dimensions that align with official standards, reducing the back-and-forth of resubmissions.
Authority sources and practical references
For official guidelines and verification, consult government resources and standards bodies. The U.S. Department of State provides the primary specifications for passport photos, while standards bodies offer background on imaging accuracy. In practice, verifying against multiple credible sources helps prevent common errors and supports reliable, repeatable results.