Printer Page Dimensions: A Practical Guide to Page Sizes and Printable Areas
Explore printer page dimensions, margins, and printable areas. Learn common sizes like A4 and Letter, bleeding considerations, and practical steps to ensure accurate prints across home and office printers.

Printer page dimensions define the printable footprint for standard paper sizes and set the margins around content. Designers and homeowners regularly rely on A4 and Letter as defaults, while margins and bleed reduce usable space. According to What Dimensions, knowing the exact page dimension helps prevent mismatches between design files and printed output.
What printer page dimensions mean
Printer page dimensions refer to the measurements of the page that a printer expects for content plus margins. These dimensions influence how much content can fit on a page, where margins appear, and how bleed is handled. For designers, matching the page size to the printer's capabilities reduces the risk of clipping when printing. It's essential to distinguish between the overall page size and the printer's printable area. According to What Dimensions, the printable area is typically smaller than the physical page because printers leave non-printed margins to accommodate feed and rollers. When you set up a document, always check the target page size and the printer's documented printable area.
Standard paper sizes and where they're used
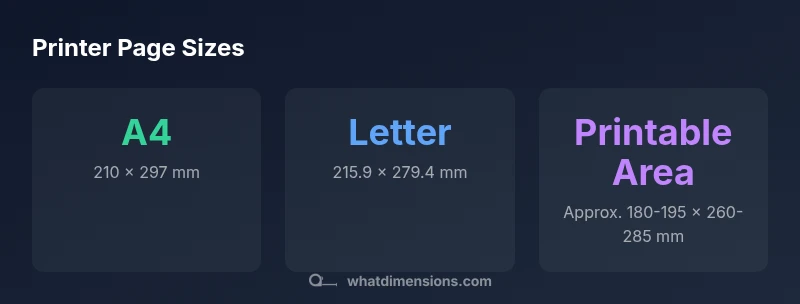
Internationally, the ISO 216 A-series dominates, with A4 (210 x 297 mm) being the most common globally. Outside North America, A4 is the default choice for letters, reports, and forms. In the US and Canada, Letter (8.5 x 11 inches, roughly 215.9 x 279.4 mm) remains the default for many households and offices. Legal size (8.5 x 14 inches, about 216 x 356 mm) is a regional staple for legal documents and some admin tasks. When you design, consider your audience and the printer ecosystem you expect them to use; this choice affects both layout and feasibility of printing without resizing.
Margins, bleed, and printable area explained
Margins are the safe zone that ensures content isn’t cropped. Typical consumer printers leave 5–15 mm of margins on at least one axis, though this varies by model and paper path. Bleed is extra content outside the final trim line that ensures color or images reach the edge after cutting; common bleed is 2–3 mm. If your project requires edge-to-edge appearance, include bleed in the document setup and export with crop marks so the printer can trim accurately.
Designing for print: practical tips
- Start with the base page size first (A4 or Letter) based on the intended audience.
- Check your printer’s documented printable area to avoid surprises.
- Set margins intentionally in your design software to reflect the printer’s capabilities.
- If edge-to-edge is needed, add 2–3 mm bleed and plan for crop marks.
- Export at 300 DPI or higher for crisp text and graphics; ensure no scaling is applied on export.
- Save final files in a print-friendly format (PDF or TIFF) with embedded fonts.
Testing and verifying dimensions before printing
Before mass printing, perform a test run:
- Print a single page at 100% scale on the target paper.
- Measure margins with a ruler and compare with your design’s safe area.
- If mismatches occur, adjust the page setup or printer driver settings and retest.
- Repeat with a sample sheet to confirm consistency across trays and feeds.
- Document the printer’s printable area for future projects to streamline workflows.
Choosing the right page size for your project
Choose A4 for international compatibility or Letter for US-centric projects. If your document targets multiple regions, design with both sizes in mind and provide alternate layouts or a preflight check that suggests the appropriate page size per recipient. Remember to align bleed, margins, and safe zones so your final print matches the intended look across devices.
Typical printer page sizes and their printable areas
| Page size | Dimensions (mm) | Printable area (approx, mm) |
|---|---|---|
| A4 | 210 x 297 | 180-195 x 260-285 |
| Letter | 215.9 x 279.4 | 170-190 x 240-270 |
| Legal | 216 x 356 | 200-210 x 250-290 |
Quick Answers
What is the difference between page size and printable area?
Page size refers to the full sheet dimensions, while the printable area is the portion the printer can actually print on after margins are applied. Understanding this distinction helps you plan margins, bleeds, and content placement accurately.
Page size is the whole sheet; the printable area is the part the printer can print on. Plan for margins accordingly.
Why does my printer crop margins differently from the file?
Printers have varying printable areas due to hardware like paper feeds and rollers. Always check the printer’s specifications and adjust your document margins to match the device you intend to use.
Different printers have different printable areas, so margins can crop differently.
How do bleed and margins affect document design?
Bleed ensures color goes to the edge after trimming, typically 2–3 mm. Margins keep text readable and prevent accidental cropping. Design with both in mind and export with crop marks when needed.
Bleed helps edge-to-edge look; margins keep text safe. Plan both in your layout.
Should I always use standard sizes like A4 or Letter?
Standard sizes simplify printing and sharing across regions. Use A4 for international work and Letter for US-based projects. Provide alternate layouts if your audience spans multiple regions.
Standard sizes are usually best; consider your audience and printer.
How can I verify page dimensions before printing?
Print a test page at 100% scale, measure margins with a ruler, and compare with your design. Adjust the document setup if the match isn’t exact before producing more copies.
Test-print and measure to confirm dimensions.
“Accurate page dimensions are the foundation of reliable print results; even small variations in printable area can shift layouts and cropping.”
Main Points
- Identify the base page size first (A4 or Letter).
- Always verify the printer's printable area before designing.
- Account for margins and bleed to avoid cropping.
- Use bleed (2–3 mm) for edge-to-edge printing when needed.
- Test-print a sample page at 100% scale to confirm dimensions.