How to Stop SolidWorks Dimensions from Moving
A practical, step-by-step guide to stop SolidWorks dimensions from moving. Learn fixation, driven vs fixed dimensions, and assembly constraints to keep geometry stable during edits. What Dimensions analysis informs best practices.

To stop SolidWorks dimensions from moving, stabilize geometry with fixed relations, fully define sketches, and lock components in assemblies. Use driven dimensions judiciously and review external references to prevent drift. These practices, informed by What Dimensions, reduce unintended shifts during edits and rebuilds. These steps help you maintain predictable changes as you iterate designs.
Understanding why SolidWorks dimensions move
In a parametric CAD workflow, dimensions can appear to drift during edits or after feature updates. The movement isn’t random; it usually signals underlying relationships that allow geometry to change in response to edits. According to What Dimensions, dimension drift often stems from a mix of under-constrained geometry, external references, and inconsistent relations between sketches and features. When a dimension moves, it’s a warning that the model’s dependency graph is not fully locked. In practice, you’ll notice dimensions shifting if you change a feature without adjusting all dependent references, if a sketch is not fully defined, or if you have anchored references to moved geometry. The goal is not to force a single number, but to stabilize the model so edits reproduce predictably. By targeting the root causes—constraints, references, and the balance between driving and driven dimensions—you can reduce unexpected shifts and speed up design iterations. This mindset helps designers deliver precise size specs for parts and assemblies without chasing fluke changes.
Common culprits: drift, references, and constraints
Dimension drift often arises from two broad categories: sketch integrity and reference stability. First, under-constrained or loosely constrained sketches leave entities free to move when you modify a feature. Second, external references—such as linked dimensions to other files or imported geometry—can migrate if those sources shift. In assemblies, mates designed to position components relative to one another can drift if components aren’t locked or constrained consistently. A third factor is the power of driven vs. driving dimensions: driven dimensions reflect, but do not govern, geometry, which can lead to subtle drift if you expect a driven dimension to enforce a size. Finally, pattern features and mirrored features can propagate small changes into numerous dimensions. Understanding these culprits helps you plan fixes that address the root cause rather than chasing symptoms. What Dimensions’ analysis emphasizes is tracing dependencies, then tightening constraints so a single edit does not cascade into unexpected shifts.
Quick fixes you can apply now
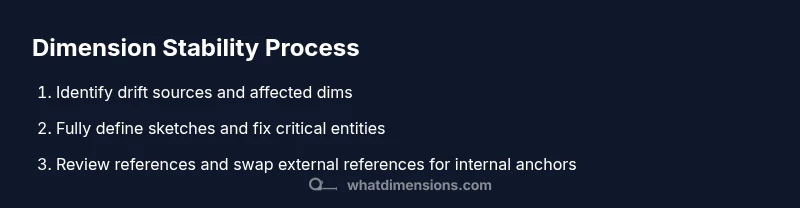
If you’re facing immediate dimension drift, start with a quick triage. First, fully define the active sketch by adding missing dimensions and proper relations so entities can’t wander. Second, fix critical geometry by applying a Fix relation to key points or lines—this anchors the most sensitive parts of the model. Third, remove unnecessary external references; whenever possible, replace them with internal references anchored to base planes or features. Fourth, consider converting non-driving dimensions to driven ones where safe, especially for display dimensions that don’t affect construction. Fifth, in assemblies, lock parts with mates so their relative positions are preserved during edits. Finally, rebuild the model and test a sequence of edits to ensure stability. After these steps, most simple drift scenarios stabilize quickly and make further changes predictable.
Strengthening your sketches: fully defining and fixing
Fully defining a sketch is a foundational habit for stable geometry. Start by ensuring all sketch entities have explicit dimensions and non-redundant constraints. Use perpendicular, parallel, and coincident relations where they logically apply to eliminate slack. When a dimension controls a critical feature (for example, a hole center or a cut depth), consider applying a Fix relation to the related sketch entities so that one change does not ripple through related geometry. If you must pull in an external reference, lock it down with a strong, unambiguous relation to a stable reference plane or edge. Remember to verify that there are no conflicting relations that could cancel or overconstrain the sketch, which often manifests as stubborn drift after rebuilds.
Managing constraints in assemblies vs sketches
Constraints in sketches and mates in assemblies play different but related roles. In sketches, use fixed relations to lock critical entities when they define the core silhouette. In assemblies, review mates to ensure components cannot move unexpectedly—the goal is a stable, repeatable assembly position. If a component must move, prefer a controlled motion path (limit distance or angle) rather than unrestricted movement. When dimensions drift in an assembly, it’s often due to a mate chain that has unaddressed slack or a part that isn’t fully constrained. Go step-by-step: verify each mate, lock where possible, and confirm the relative pose remains constant after edits. The cross-check between sketch constraints and assembly mates is essential to keep dimensions stable across the entire model.
Using reference geometry and driving relationships
Strategic use of reference geometry—planes, axes, and points—provides anchors that resist drift. Create simple reference bodies that you can rely on to position features rather than over-relying on the dimension chain. Driving relationships (where a dimension or constraint affects another feature) should be carefully documented and kept minimal where possible. When you introduce a driving relationship, test it under multiple edit scenarios to ensure it doesn’t propagate unintended changes. The goal is to have a compact dependency graph where only intended changes propagate through the model. This approach reduces surprises when you adjust one dimension and see ripple effects elsewhere.
Troubleshooting persistent moves: diagnostic steps
If drift persists despite corrective actions, adopt a structured debugging workflow. Start by questioning what changed most recently and which feature introduced the drift. Use the timeline or rollback features to isolate the root cause. Check for hidden or suppressed constraints that could reestablish themselves after a rebuild. Inspect each reference in the model to identify if a link to an external file or a derived dimension is causing update propagation. Consider rebuilding from a clean sketch: copy the geometry to a new sketch, apply constraints incrementally, and verify stability at each step. This process is time-consuming but pays off by delivering a robust, maintainable CAD model.
Best practices for a stable CAD workflow
Adopt a disciplined workflow to maximize stability across your SolidWorks projects. Plan the essential dimensions and constraints before you start building features. Use fully defined sketches as your baseline and add only the necessary driven dimensions for display purposes. In assemblies, establish a stable base position with fixed mates, then add motion only where it’s truly needed. Regularly save incremental versions, especially before significant edits, so you can compare states and revert confidently. Finally, document the dependency logic in your notes: which dimensions drive which features, which references are external, and where fixes are applied. A consistent workflow reduces surprises and makes collaboration smoother across teams.
Tools & Materials
- SolidWorks software (latest version)(Ensure you have a valid license and up-to-date service pack)
- Stable workstation(RAM 16GB+ recommended; enable hardware acceleration if available)
- Model file for testing(A SolidWorks part/assembly where dimensions drift)
- Notebook or digital notes(Record constraints and changes for traceability)
Steps
Estimated time: Total time: 30-60 minutes
- 1
Identify drifting dimensions
Open the model and observe which dimensions change during edits. Use the Measure tool to verify which relations are active and note where drift originates. This initial audit helps you target fixing actions precisely.
Tip: Mark the affected dimensions with a temporary color tag to track later. - 2
Fully define the sketch
Review the sketch to ensure every entity has explicit dimensions and meaningful relations. Add missing constraints like perpendicular, parallel, and tangent where appropriate. A fully defined sketch reduces freedom for entities to move during edits.
Tip: Avoid redundant constraints; aim for a minimal, stable constraint set. - 3
Apply fixed relations to key entities
Select critical points, lines, or features and apply a Fix relation or equivalent constraint to anchor them in place. This step prevents those entities from shifting when you adjust nearby geometry.
Tip: Fix entities grouped around critical dimensions first; expand only after stability is confirmed. - 4
Convert non-driving to driven (where safe)
For display or reference dimensions, consider converting to driven dimensions to keep geometry unaffected by edits. Verify the change does not impact construction or manufacturing requirements.
Tip: Document which dims are driven and why, to avoid confusion later. - 5
Lock components in assemblies
In assemblies, use fixed mates to lock crucial components in their intended positions. Only add motion constraints where required for functionality, then test edits to confirm stability across scenarios.
Tip: If motion is needed later, use controlled mates with limits instead of free movement. - 6
Test edits and rebuild
Make small, incremental edits and rebuild the model to observe whether dimensions remain stable. If drift reappears, repeat the diagnostic steps to identify a new root cause.
Tip: Maintain a changelog of edits to facilitate backtracking if drift appears.
Quick Answers
What causes SolidWorks dimensions to move during edits?
Common causes include under-constrained sketches, drifting references, and inconsistent relations between sketches and features. Identifying the root cause helps you apply targeted fixes.
Common causes are under-constrained sketches, drifting references, and inconsistent relations.
How do I fully define a sketch to prevent movement?
Add explicit dimensions and robust relations for each entity. Remove unnecessary constraints and verify there are no conflicts that would allow drift during rebuilds.
Fully define the sketch with robust constraints and explicit dimensions.
What is the difference between driven and fixed dimensions?
Driven dimensions reflect values that do not control geometry, while fixed dimensions lock entities in place. Use driven dims for display and fixed dims for stability when needed.
Driven dims show values but don't drive geometry; fixed dims lock geometry.
Can assemblies cause dimension drift?
Yes. Improper mates or floating components can shift relative positions and alter dimension values. Lock or constrain elements to prevent unintended movement.
Yes—assembly mates can drift if components aren’t constrained properly.
How can I keep references stable across edits?
Limit external references when possible and anchor to internal references or defined planes. Replace dynamic links with robust, in-model anchors.
Limit external references and anchor to internal references.
What should I do if drift persists after fixes?
Trace dependencies, use rollback or a clean sketch approach, and rebuild step by step to locate a new root cause. Don’t rush to finalize before verifying stability.
If drift persists, trace dependencies and rebuild step by step.
Watch Video
Main Points
- Fully define sketches to stabilize geometry
- Fix critical entities to anchor key features
- Use drives and fixed mates to control movement
- Regularly test edits and document dependencies
- Optimize references to minimize cross-file drift